DIY Canvas Rug

Welcome peeps! It’s the first Wednesday of the month which means that it is time for our monthly DIY Challenge. Terrie from Decorate and More With Tip is our fearless leader. This month she posed the challenge of making something from canvas. So today I’m sharing a DIY canvas rug.
 I’m always amazed by the talented bloggers who participate in the challenge every month and this month is no different.
If you are coming here from Gail’s, Purple Hues and Me, welcome!
DIY Canvas Rug
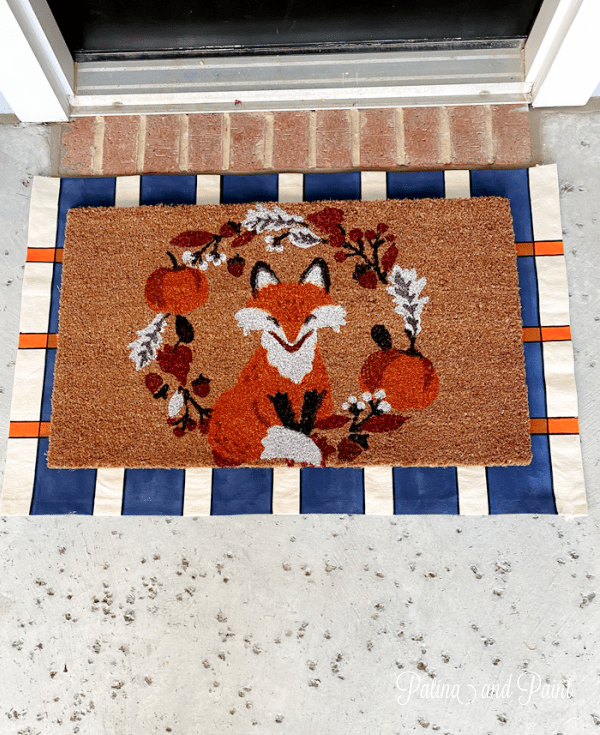
I love to layer my entry rugs.
A pretty patterned rug followed by a doormat with a catchy slogan or shape just makes my heart patter!
Recently when I was planning what to do on the back porch I was a little stumped.
I wanted a rug that had navy, black, white and orange in it.
Something that matched the ribbon I had recently purchased.
However, I couldn’t find one anywhere.

So when Terrie said ” DIY canvas challenge” a light bulb went off.
I’ve had this roll of canvas just hanging out in my closet for years.

Supplies
Here’s a list of the supplies you will need:
Canvas
Acrylic Paint
Paint brush and paint markers
Ruler
Scissors
Sewing machine or glue
Blue Tape – I used two sizes 2 1/2 inch and 1 inch

Step 1
Cut your canvas.
Since I wanted a finished rug to be 24″ x 36″, I cut my canvas 26″ x 38″.

On each edge, fold 1 inch into the center and pin.
Do this on all four sides.

Step 2
Sew canvas.
Sew 5/8″ from the pinned edge on all four sides.
TIP: If you don’t have a sewing machine you could use fabric glue!

Step 3 and 4
Lay out your design on the finished side of the canvas.
Since I’m doing a large plaid, I found the center and marked my largest stripe using my 2 1/2″ blue tape.
Next, place your blue tape on both sides of the original tape.
Remove the center piece of tape, leaving the tape on either side.
Continue alternating and removing tape until you have stripes taped off on your rug.
Make sure you rub the tape down really well to prevent paint from bleeding underneath it.
Paint the large vertical stripes.
TIP: Remove the tape after you have finished painting the stripes.

Step 5
Once the larger blue paint stripes have dried, mark off your smaller horizontal stripes.
Using a 1″ blue tape off your stripes.
Paint your stripes and remove the tape.
Let dry.

Step 6
Once the horizontal stripes are dry, it’s time to look and see if you have any bleeding.
I had a tiny bit of bleeding as it’s almost impossible not to have a small bleed here and there.
Honestly, small tiny ones don’t bother me.
I mean, real woven material isn’t totally a straight line, right?
If you do have a tiny bleed here and there you can fix this!
Using a paint marker and ruler, draw a straight line over your bleed.
Works like a charm and adds to the design!

Step 7
Heat set your rug once it is completely dry.
I used my iron to do this.
No steam, just high heat.
TIP: be sure to cover the painted design with a clean lint free cloth as you are ironing.

Step 8
Spray with a scotch guard type spray to ensure that your rug is stain and fade resistant.
My DIY canvas rug is done and ready to use.
The best part for me is that it mimics my ribbon.
This gives my patio a custom look.
It’s the little details like this that make a room sing.
Now please join me in heading over to Jodie’s at The House House, I can’t wait to see how she painted her artwork!
Also, at the bottom of the page I will leave a list of all the other participants so that you can see – and visit – all of their wonderful DIY canvas projects!
Until next time….


DECORATE AND MORE WITH TIP | BLUESKY AT HOME | PURPLE HUES AND ME | PATINA AND PAINT


The House House | Paula’s Homemade Space | K’s Olympic Nest

Tammy, you went all out on this challenge. I never even thought about using a roll of canvas. I love how you painted the stripes. It’s such a cute pattern. What a fun project.
Thanks Carol. I’m trying to clean out my craft closet and use as much of the stuff laying around as possible. I feel like its multiplying.. ha! It is truly an easy and fun project!
Tammy! This is so cute! I love the colors and the print too. It’s perfect. Great job.
Thanks Jodi! I am enjoying it for fall… now I’m thinking of making one for Christmas? Hmm… it really is a fun project.
So cute. I have an extra large canvas up in the attic, I think I am going to try to give this a whirl. Thanks for sharing. I love how it looks under your cute fox door mat.
Go for it Terrie! It really is a fun project. With your talent I am sure you will make something fabulous!
What a fabulous idea using canvas, Tammy! Your door mat looks amazing! You are so talented and creative! I love it!
Thanks so much Gail! I’m glad you liked it as much as I do. Thanks for all of the encouragement.
Your door mat looks so great! Great idea to use a roll of canvas! Thanks for sharing.
Thanks so much Paula. I’m super happy that I found something to do with the canvas. Feels so good to find a use for something just laying around and it’s useful too!
So pretty Tammy. This looks like ribbon weaved together.
Thanks Cindy! I never thought about it looking like ribbon weaved together, but I see it now!
Your entry is so stinkin’ cute! Makes me wish my daughter had left her canvas roll behind. However, I do have some Dollar Tree area rugs that just might find themselves getting a much needed makeover (hmmm….). So creative!
Thanks Kelli! I say go for it…. it’s a fun craft and the fact that you can make it any color or design that you want is awesome! Send pics if you make some..I love to see what others are making!