How To Make A Solar Lantern
Today I’m collaborating with some talented bloggers for the DIY Challenge. Terrie, our host, from Decorate And More With Tip issued the challenge to make something from a solar light. So I thought I’d share how to make a solar lantern.
If you are coming here from Gail’s – Purple Hues and Me, welcome! I’m so glad that you are here!
Supplies:
Plywood
Jigsaw
Wood Reed
Scissors
Staple gun and staples
Spray Paint or Stain
Wood Glue
Solar light
Eye Screws
Drill
Drill bits
Sting or small chain
Step 1:
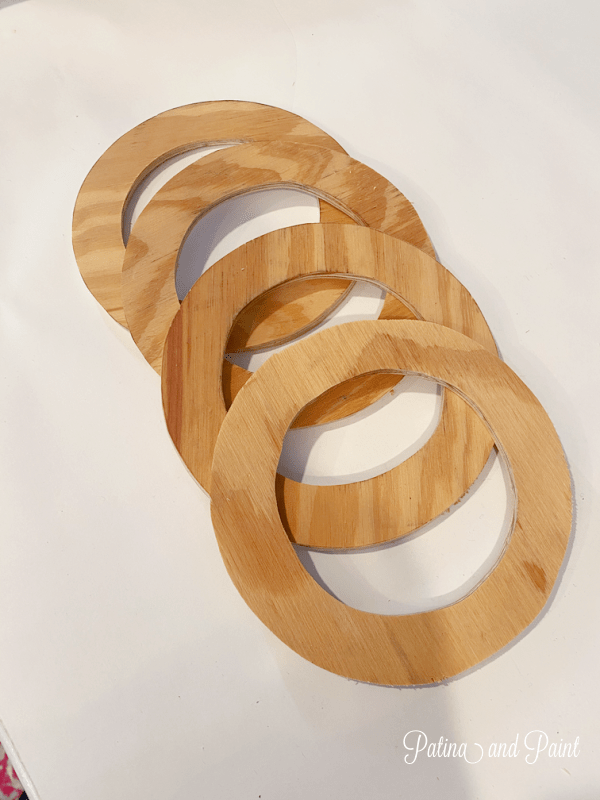
Cut 4 circles from 1/4″ plywood with a jigsaw.
I cut mine outer ring 6″ in diameter and the inner circle 5″.
Step 2:
Cut 16 pieces of the wood reed 15″ long with scissors.
Step 3:
Mark 3/4″ from the end of each wood reed.
Turn the reed over and mark the opposite end 3/4″.
Step 4:
Place the 3/4″ mark on the outside edge of a circle and attach 4 reeds at 1/4 intervals on the circle with a staple gun.
Step 5:
Fill in the spaces on either sides of the first 4 reeds with 2 reeds, they will overlap slightly.
Continue until all spaces on the circle are filled in.
Step 6:
Using spray paint – or stain – paint the lantern, base, top circles and all sides.
Let dry.
Step 7:
Use wood glue to attach a wood circle on top of the lantern base.
Secure with 1/2″ brad nails or staples.
Step 8:
Use an 8″ piece of 2 x 4 as support to attach reeds to the top cut out circle with staple gun.
Finish stapling reeds to the circle the same way as in step 5.
Step 9:
Use wood glue and staples or brad nails to attach the last circle to the top of the lantern.
Step 10:
Remove the stake from the bottom of your solar lantern.
Doing this on my solar light left a hole that I covered using black electrical tape.
When I was done, you couldn’t even see that I had put tape over it.
However, most solar lights have the stake on the bottom so this will not be an issue.
OR, you could glue on pretty pieces of glass, rocks etc.
Step 11:
Attach eye screws to the top of the lantern.
Using a pencil, lightly mark your top lantern circle into thirds.
Pre-drill your marks. ( Make sure that your drill bit is slightly smaller than the eye screw. DO NOT drill all the way through both circles.)
Screw the eye screws into the pre-drilled holes.
Attach a string or chain to your eye screws.
Step 12:
Drop your Solar light into the top of your lantern.
Step 13:
Hang your lantern and enjoy!
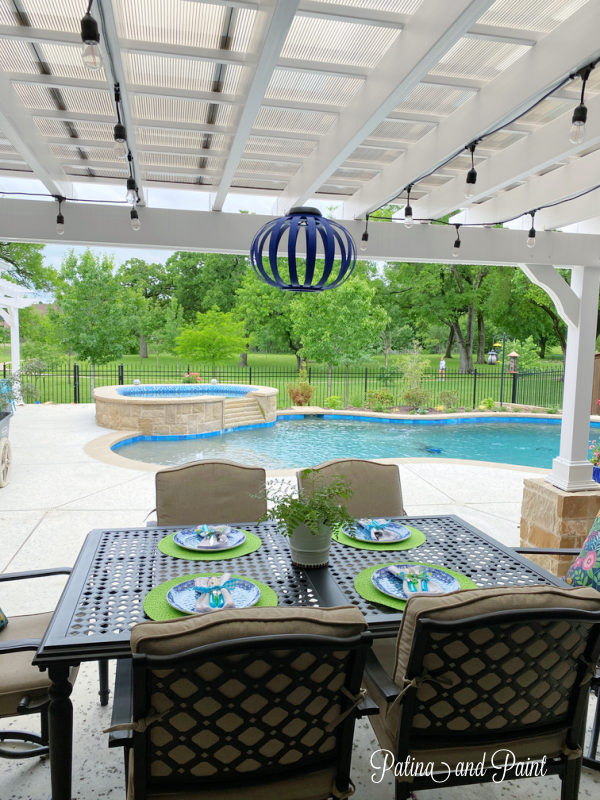
I love how my lantern turned out.
Even though this project took a lot of steps and a few days to complete, I had a great time making it.
Plus, I love a project that is something that not only looks pretty, but one that you will use daily!
But the big question is: how does it look at night?
Like this.
I LOVE it!
I also loved sharing with you how to make a solar lantern and hope that you will join me in checking out all of the other solar light projects that my fellow bloggers created.
Now please head on over to Jodi’s – The House House and see what kind of solar light project she has for us.


DECORATEANDMOREWITHTIP | PURPLEHUESANDME | PATINAANDPAINT | THEHOUSEHOUSE


PAULASHANDMADESPACE | B4ANDAFTERS | SWEETSOUTHERNGRACE | KSOLYMPICNEST
If you love it, be sure to PIN it for later!


This is so neat, I love how you created a lantern for your back porch. It looks amazing. Perfect piece above the table. Great job!
Thank you Terrie! Loving the low light in the evening for sure!
Wow, Tammy! Your hanging solar lantern looks amazing! You have some serious woodworking skills! What a fabulous idea!
Thanks Gail, but I have to admit I had help with the wooden circles. Thanks Goodness my hubby is around. I have used all different kids of saws but the one I haven’t used much – and is suppose to be the easiest – is the jigsaw. I’m hoping to get better!
Your solar lantern looks so pretty on your back porch! Great job putting it all together!
Thank you Paula. We are enjoying the ambient lighting the evenings for sure!
Now, Tammy this is what I would have wanted to do. Only problem, not top on our deck, lol. I love this look so much!
Cindy you can make these to sit on a table top. Instead of rings on the bottom, just put two solid circles and skip the eyescrews! I had fun making these. The only hard part was cutting out the circles. So I had The Hubs do that!
You are so creative. Love the solar light and how it really pulls everything together. Pinned
Thanks Cindy! That means a lot coming from you as you are one of the most creative people I know. You made my day!
Oh my gosh! I am loving how your created your light!!!!
Thanks Shae. If was fun to make for sure!
Wow! This is absolutely awesome. I love it so much.
Thank you Jodi! I keep thinking I might make a couple of smaller ones in different bright blues and hang them all together…. we shall see if I get the motivation..lol
This looks so nice. You have inspired me to think about how I could do something similar for a bedroom pendant. Great tutorial!
Kelli this lantern can be made with a solid bottom so that you can put it on a table and I can also see it made with a smaller opening at the top for a light kit. If you make one for your bedroom I’d love to see it.
Your pool is so pretty– what a perfect backdrop for your solar lantern! I’ve pinned it to my Creative Solar Lights board. Everyone has had the best ideas….. maybe I should ask permission to use all the pictures in a collage– 8 Of The Best Creative Solar Lights!!! And I love the blue you chose.
You are so right, everyone had such great ideas this DIY Challenge. I loved seeing everyones ideas. Thanks for the pin and you have my permission so use away!
Your lantern is so pretty! And I love your back deck. Beautiful!
Thanks Michelle! I have to admit that making the lantern was fun and we do enjoy hanging on the back deck – we are definitely outdoor peeps!