Back To School Clipboard
Welcome to August’s edition of $10 on the 10th! This month our theme is Back To School. As I was thinking of what I wanted to share with you, it occurred to me that organization is key to start out a new year. So I’m sharing a back to school clipboard.
Hey! And just so you know, clipboards aren’t just for teachers.
Students can use them.
Mom’s can use them to post weekly schedules, chore charts, after school activities… the possibilities are endless.
They can be carried around, hung on a wall or placed on a desk.
AND not only are they super useful for organization, they can be super cute too!
Supplies:
I found this clipboard at the Dollar Tree.
Of course, it was only $1.00!
You will also need acrylic paints and paint brushes.
Blue tape
Clear Spray Sealer
Ruler
Pencil
Back To School Clipboard – Step 1
Paint your clipboard.
I’m not going to lie, this clipboard was super porous.
I think I may have put about 5 coats of white base coat on it.
Note to self: give it a light spray of clear sealer before base coating!
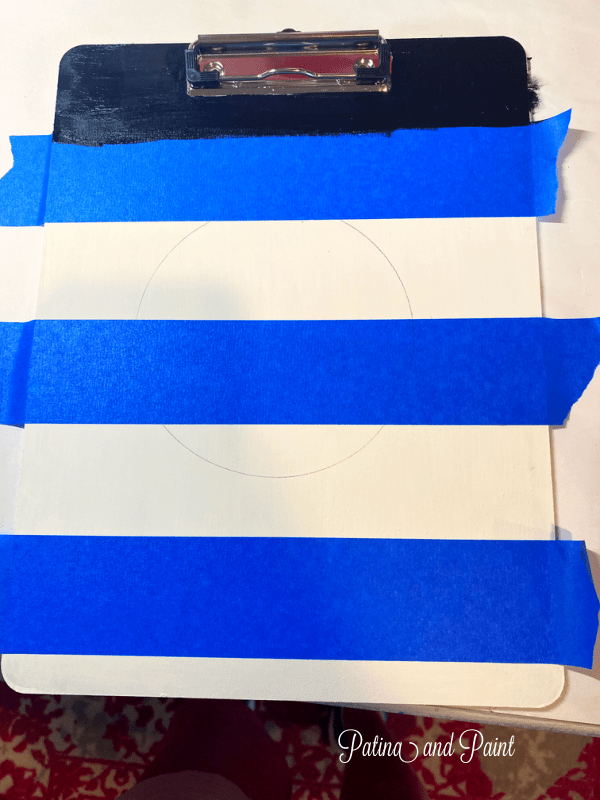
Once my base coat was dry I drew on a circle in the middle of the clipboard.
Then using 2 inch blue tape I taped off the board for painting.
Step 2
Once you have taped off your board, go back and really burnish – or rub hard- the edges of your tape to prevent the paint from bleeding.
Step 3
Paint the design on your board.
I know, some of you are thinking that you can’t paint.
That’s okay.
You CAN decoupage, use decals, and stencils.
This is the time to get really creative!
Step 4
Once your design is finished and completely dry, add a name or monogram.
Again, if you aren’t comfortable painting the letters, then you can make or order vinyl lettering.
Stencils are great to use here too.
Step 5
The back side of your clipboard needs love too.
So paint it!
This is where you really want to get creative and have fun with decorating it.
Step 6
Give both sides a couple of good even top coats.
I like to use a clear spray sealer for even coverage.
Once this is done, your back to school clipboard is done!
So what did I spend on my clipboard?
I already had the paints and spray sealer.
The only out of pocket expense was the clipboard for $1.08 including tax.
However, even if you did buy the paint, clipboard and sealer you can easily make one of these for under $10.00.
Here’s a bonus tip.
My sweet niece Beep is going into 4K this year, so I painted her a back to school apron.
The apron you can find here.
Simply draw on your design, paint with multi-surface paint or acrylic paints with a fabric medium added and you have a custom cute back to school apron!
Don’t want to paint?
There are a ton of iron on designs available!
Now be sure and head on over to all of the other $10 on the 10th participants to see what fun back to school items they are sharing.
Allyson – Southern Sunflowers
Barbara – French Ethereal
Cindy – Cloches and Lavender
Terrie – Decorate and More With Tip


Oh my! What a cute idea! Those clipboards would make great teacher gifts. 👍🏻
And “Beep” is a precious little model.
Thanks Karen, Beep is a cutie with a 4 year old attitude. The clipboards would make cute teacher gifts… and so easy to make!
Super cute clipboard. One day you are going to have to give lessons on painting, your one of the best!! The apron you made for Beep is so darn cute.
Awww Terrie you made my day.
Super cute idea! Love that it can be used on both sides!
Thanks Cindy! You know if I can make anything functional cute I will and here at the Castle if it doesn’t move on it’s own I will be painting it. lol
Oh, your niece is adorable in her new school apron!!! I have to say, I love making clipboards pretty… Yours turned out great and I appreciate the emphasis to really “burnish” the tape down before painting the second color. Really fun project for school and for around the house!
Thanks again for the fun idea,
Barb 🙂
Thanks Barb, we do enjoy Beep and she loved that apron! She wore it here recently to play with slime sand I was crazy enough to buy for her. Happy to say that the apron held up but the patio where she played with the sand didn’t fair so well! lol
Tammy, your niece is just adorable in her new apron!!! I love making clipboards pretty and have made a few over the years… Yours is really pretty!!! I appreciate too that you really emphasized “burnishing” the tape so the second paint wouldn’t bleed underneath.
Great job and enjoy your new clipboard,
Hugs,
Barb 🙂
Love your whimsical floral design you painted and it really pops on the stripes! I give you an A+ lol.
Thanks Allyson, I’ll take that A+!lol
This is beautiful! 10 on the 10th looks like so much fun. I have been checking out everyone’s posts for a few months. I would love to join if yall ever want to add someone else!
Girl you are welcome to join us anytime! If you are serious give me a shout at tammy@patinaandpaint and I will give you all of the details! We would love to have you join in.