DIY Fall Art

It’s the first Wednesday, which means that it is time for the September DIY Challenge. It’s my first time to participate and I’m so excited! I’m sharing how to make some DIY fall art!

Terrie at Decorate and More With Tip is our hostess.
She put out the challenge to take scrap wood and make it into fall decor.
Lately, I’ve seen a lot of the sweetest small farmhouse artwork which had galvanized tin ribbon used in place of a wooden frame.
I’ve been wanting to make some for awhile now, so when Terrie sent out the challenge I knew exactly what I would be making!

The first thing that I did was grab a piece of 1 x 6 scrap wood from The Hub’s wood pile.
The Hubs was kind enough to cut out several 6″ X 6″ wood pieces for me.

Once the wood was lightly sanded, I gave each piece a base coat of paint.
For this project I used acrylic craft paint.

When the base coat was dry I painted the back ground, before drawing the pumpkin design that I wanted to paint.
In the interest of time, you can see how to paint a pumpkin here.
These are super easy to paint, I promise!
It was so much fun painting these that I made several, all with different designs.

Once my pumpkin was painted, it was time to add my galvanized ribbon trim.
I found 30 feet of galvanized fluted tin ribbon here.

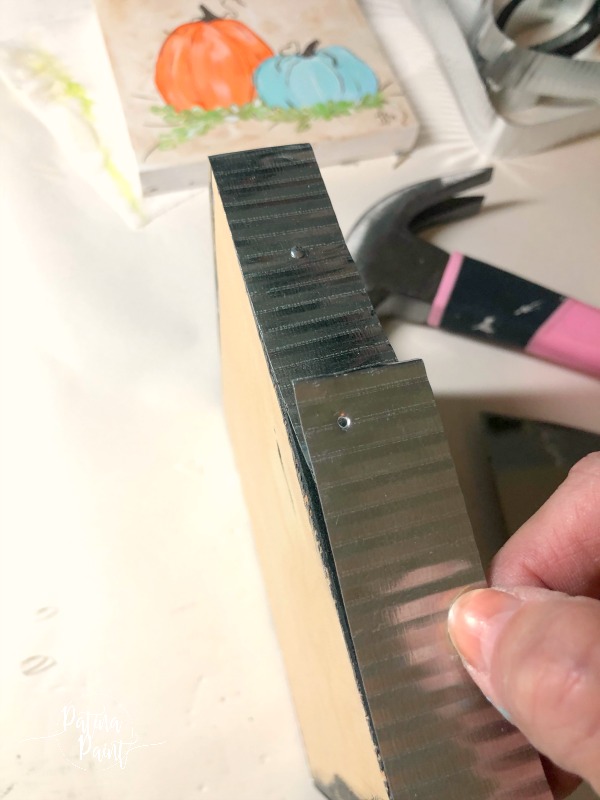
NOTE: this tin has sharp edges. Safety first people! I recommend using gloves when handling the tin. I didn’t and I have the cuts and scratches to prove it. Don’t be like me.
To determine how much of the tin that I would need to use, I simply multiplied 6 x 4 and added and inch for overlap at the top.
I used a pair of tin snips to cut the tin.

Remember that I said that the edges of the tin was sharp?
Once the ends are cut, they are super sharp!
So sharp, that you don’t even realize that it is cutting you sharp.
I took a piece of sandpaper and sanded the cut edges until they were dull and smooth.
At first, adding the tin to the wood was a little challenging, but once you get it started it comes together quickly.
Starting at the top, in the middle of my artwork, I used small brad nails to attach the tin to the wood.
I spaced the brads evenly, approximately an inch and a half apart
When I hit the corners, I pulled tightly, then bent the tin all the while trying to keep the tin as close to the wood as possible.
I did this all the way around the piece until I was back to the top of my artwork.

To finish them off, I added a picture hanger to the back.

These are my finished pieces and I couldn’t be happier with them.

My plan was to hang them on the wall in my kitchen.

However, I’m loving how they look standing in my hutch!

I think that my DIY fall art will be staying here awhile!
Now please join me in visiting my fellow September DIY Challengers:
You are invited to the Inlinkz link party!
They are all so adorable. I want a set!! You are such a talented painter. The metal frame just made it that more wonderful. Thank you for joining in on the fun. I love working with you. Happy Wednesday!
Terrie I love the DIY Challenge! It makes me get my creative hat on, thanks so much for putting this together. I’m sure that I can arrange for you to get a set… we will talk later! Have a great week my friend!
Look at you!! Those look so much like the work of that artist we both love. Way to go girl!!
Thanks Stacey! Our favorite artist is way more talented than I will ever be. I kind of feel guilty about making them – although I DO have some of her work. She is just the best. I want to be her when I grow up.
I absolutely love your painted pumpkin!!!
Thank you Shae! I’m loving this months challenge. So Fun and have met some of the best people that I have had fun working with!
These are beautiful! I had no idea there was such a thing as corrugated tin ribbon. 😀 You are so creative!
Michelle I had no idea they made the tin ribbon either, just happened upon it on Amazon one day. I knew I had to make something with it!!!
Super cute, Tammy!
Thank you Rita! Trying to get into the fall mood awhile not sweating to death every time we step outside! lol I really need some cooler weather.
Girl, you did a fabulous job! I love these paintings! I couldn’t draw one of these to save my life… you are so talented!! Hugs!
Oh this is so cute! I love the tin frame!
Thanks Jessica!
Thanks girl! I love the frame too, I keep thinking what else could I use it for! lol
Wow! You did an awesome job. I love the blue!
Thanks Danya! The blue is my favorite too. This DIY Challenge was so fun. A super talented group of women to work with!
I love how these turned out! What a great project….I’d make some but I really don’t know what my pumpkins would turn out looking like. Let’s just say I’m not artistic like you clearly are!
Thank you Tara, you are too kind!
Tammy, those signs are precious. You are so talented. I’ve never seen the tin edging before. Great trim material to know about. What a great way to use scrap wood. So cute on your hutch.
Thank you so much Carol! You’ve made my day!
Tammy, theses are so super cute! I love the idea of the galvanized trim, with the buffalo checked bows. The one with the black background is my favorite. Great job!
Thank you so much Jackie! I plan on doing a give away with one of these soon.