Trash To Treasure Tissue Box
Welcome to this month’s DIY Challenge! This month our theme is Trash to Treasure. Which I love because there is nothing better than taking something old, worn or used and making it brand new! Like my trash to treasure tissue box. I’ve been needing a new one in my bath for awhile, so this is the perfect time to making everything old new again.
A quick thanks to Terrie at Decorate And More With Tip for hosting this month.
Also, if you are coming here from Hannah’s, Baggot Farmhouse, Welcome! I’m so happy to have you here!
Now let’s get started.
Thrift Store Find
As soon as Terrie announced our challenge theme I hit my local thrift store.
This sad little tissue box was worn and was in need of a facelift.
However, at only $2.00 it was a perfect project.
Tissue Box Transformation
The first thing I did to the box was give it a good cleaning.
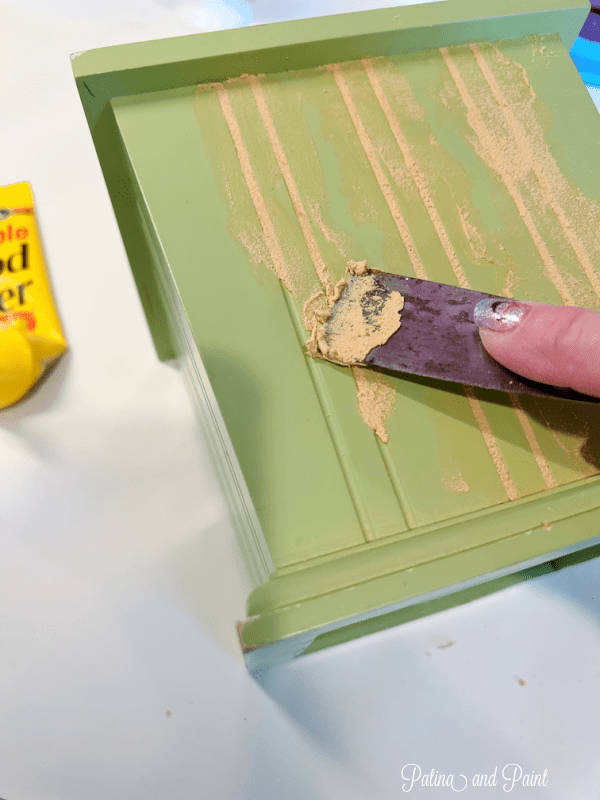
It had grooves running vertically on all sides of the box.
Since I was wanting to paint a design on the face of the box, they had to go.
The solution?
I filled the grooves with wood filler, let it dry, and then gave it a sand.
This process was repeated several times until all four sides were smooth.
Then several coats of white satin spray paint was given to the box.
Hand Painting the Tissue Box
This is the fabric that I plan on using in my master bathroom.
I wanted the tissue box to compliment it, so I matched acrylic paint to the colors in the fabric.
Last year I painted this waste basket and loved the style so much that I decided to do something similar on my tissue box.
I found a design that I liked, printed it off and taped it in place on my box.
Using erasable transfer paper and a stylus I traced the design onto my box.
Adding Rub N Buff
When adding gold accents, one of my favorite things to use is Rub N Buff.
It’s so easy.
Just rub it on, then give it a good buff with a soft cloth!
Once the gold accents were complete, it was time to paint the design.
Painting the design is super easy when you’ve traced on a design!
Once the design had been painted and allowed to dry, the tissue box was given several light coats of clear spray finish.
I couldn’t be happier with my little trash to treasure tissue box!
It matches my fabric perfectly and will give my bathroom a little something extra!
Now I hope that you will join me in visiting Niky at The House On Silverado. I can’t wait to see what her trash to treasure is!
When you are finished there be sure to go to all of the other bloggers listed below to see what they’ve done!
Until next time…


Tammy your tissue box turned out so cute. I love the design you placed on it, can’t believe you created a L out of the K. Great job. Looks perfect!
Thanks Terrie. I loved this months theme of Trash to Treasure. Now I want to hit up the Thrift Store every day! ha!
Get out! This is the cutest thing ever. I can’t believe you painted that! Even though it was traced, I think I still would have messed it up. Great job!
Wow, Tammy! What a transformation! I never would have thought to remove the grooves by filling them in with wood filler. The box looks so smooth and perfect now and oh, so pretty! I need to look for real tissue boxes now! Love the look!
Thank you Gail! It was a fun project and so happy that it matches the curtains! It’s the little things…
Your tissue box is perfection, Tammy! You are definitely one talented painter. I couldn’t paint between the lines if you paid me too! Love the colors you chose too!
Thanks Christine. I promise it’s easier than it looks!
Wow, what a transformation. I love how colorful it is now!
Niky @ The House on Silverado
Thank you Niky. Trying to add in a little more color this year, but have to admit it’s out of my comfort zone!
What?! This is so cute and what a great thrift store find! I really like the design you added to it as well.
Thanks Hannah! My new hobby may be thrift shops!
So creative and I love Rub N Buff too! Your hand painting is always amazing
Thanks Cindy! Rub N Buff has been one of my fav’s for a long time. Im not sure but I think my mom used it crafting when I was living at home on her crafts. Gotta love it!
Tammy! Your tissue box turned out so cute!
Thanks Shae!
This is so cute! I love how it is one of a kind. I kept going back to see how you created an L out of the original letters.
Girl, thanks so much! I got so busy creating the L that I didn’t take a picture. Major FAIL! Honestly I just used the left side of the K for the vertical part of the L, then drew in the bottom Horizontal part with a ruler. Once that was done I added flourishes here and there. Sorry, I didn’t take pictures of this process!